

Hey there everyone!! Here is my Halloween post about our costumes! I was pretty excited about them. & I decided to go ahead and put them up a little early, just in case you're still looking for a little inspiration. Alex & I, and a couple of our friends decided to dress up as characters from CandyLand. (Sorry, I have my jacket on, so you can't see the full costume. It was a little chilly).
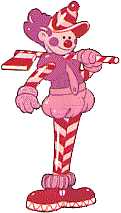
King Kandy
 |
| Our Inspiration Picture for King Kandy |
King Kandy's costume was by far the most difficult to assemble, because there is just so much to his costume! We also had to be the most creative with this one.
The only aspect of his costume that we actually purchased were red and white striped tights from a Halloween store. The rest of the costume was hand made.
Starting from the top, we made his little cupcake hat. For the base of the hat, we ended up spray painting two styrofoam bowls brown. On the inside of one bowl, we hot glued a winter hat that was lined with red and white duct tape. On the other bowl, we created a base and then covered it with cotton balls. We then spray painted this a yellow-gold color. From there, we glued this whole piece into the bowl. We then used plain cotton balls to create the white "crown" shape, with peppermint tops and the sucker from a tootsie roll pop glued to the very top.
We followed a similar process for the top of his staff... just leave out the second bowl, white "crown" and peppermints.
Speaking of the staff, this was made with papertowel tubes (the thicker the better!). We taped the tubes together and then stuffed them with newspaper to help keep it sturdy. We then wrapped it with white & red duct tape to create the peppermint effect. Finally, we glued the cupcake to the top.
 The next step of this costume was the armor. We made this out of posterpoard that has been spray painted gold. The skirt part was pretty simple, as we just created a half-skirt, and then cut the edges in a scalloped pattern and spray painted it gold. We then punched holes in the upper corners and tied red yarn to tie the skirt on. Finally, we hot glued a Tootsie Roll Pop (with sticks attached) to each section of the skirt.
 The top piece was slightly more comp-
licated. We cut out a bunch of "scales" from posterboard and spray painted those. We then cut out and painted the armor shape and attached all 24 scales. Once that was assembled, we hot glued peppermint candies to the bottom of each scale.
 Alex also wore a yellow-gold t-shirt underneath, that we found on sale at Wal-mart for only $3. To create the peppermint shoulder pads, you would just not believe what we did. We purchased a filter for a shop-vac and cut it in half (so that we had 2 circles) and then I cut the seams, so they would lay flat. We then wrapped each one with red & white duct tape for the peppermint look and hot glued them onto the tshirt.
The sleeves were made with bubble wrap & spray paint. Alex wore a gold long-sleeve t-shirt (that he already owned) for warmth, so we just taped the bubble wrap to his shirt sleeves and then around his arm, loosely, so that he could still move his arms. I also glued some thing batting that I had cut out, to create the cuffs.
For the cape, we created the top piece with yarn, cardboard, and some more batting. The actual cape piece was made out of a purple fleece blanket with some batting attached to the top edge, so it would blend into the cardboard piece. We just safety pinned this one, so I could keep the blanket after Halloween.
Finally, King Kandy has this peppermint belt, that is made with red and white electrical tape, markers, old cereal boxes, and yarn.

 |
| Inspriation for Mr. Mint |
Mr. Mint was also relatively easy. For him, we also purchased a pair of red and white striped tights from the Halloween store.
For his hat, we covered an old ball cap with the red and white duct tape to create stripes. We then glued some red yarn to the inside of the cap, to create hair.
We used electrical tape to cover an old toy hatchet.
And he ended up wearing white, instead of pink... but for his sleeves, he wore a white thermal tee with red ribbon wrapped and safety pinned around his arms. Then he wore another t-shirt on top of that. We sort of forgot about his suspenders. :( And then he just wore a pair of red shorts that he owned, and we spray painted some batting and tied them to his boots for Mr. Mint's red boots.
Princess Lolli
 |
| Inspiration for Princess Lolli |
The most critical piece for Princess Lolli's costume was her lollipops. We made a trip to the candy store and purchased 3 smaller ones for her crown, and one larger one, just for her to carry. We broke off the sticks to the smaller ones and glued them to a toy crown that we found at the Halloween store. (unfortunately, one broke). You can't really tell in this picture, but we had to use packaging tape for them to stay, because the glue just wasn't strong enough. That was the one downside to her crown, was that it was quite heavy.
She purchased a yellow halter dress, which we safety pinned Tootsie Roll pops to the bottom of. For the top, we made circles with red yarn. (In some pictures, that top part is more of an orange color). We also used pink spray temporary hair color for the hair.
Just for fun, my friend used bright pink eyelashes that we found in the Halloween section of Wal-mart.

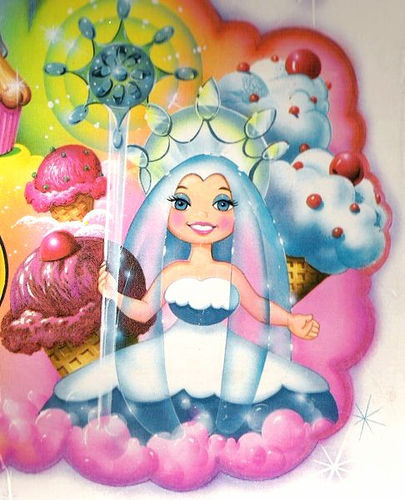 |
| Inspiration Image for Queen Frostine |
As for the crown, we used a little girls crown from the Halloween store, which had some boa-like material attached in silver and white. I also used the temporary dye to paint my hair blue.
The final step for my costume was the wand. Mine was made out of a stick wrapped in blue electrical tape with two small paper plates glued to either side. The plates were sprayed light blue, except for the edges. To create the points of the snowflake, we added sparklers (of all things!). Boy, was I scared someone would light them!! We also covered the plates with hot glue and craft glitter, and then used spray glitter to help seal (so we wouldn't have a huge glitter mess).


So these were our Candyland-Themed Halloween Costumes! I hope you enjoyed this post. I really wanted to share it, not only out of pride, but also because of the creativity we used... from vacuum filters, to paper plates and bowls, to duct tape and electrical tape.
Everyone have a happy & safe Halloween this year!!

That is very creative. I would have never thought of candy land for costumes. This post makes me want to go buy the game and play.
ReplyDeleteThis is such a cute idea. I love the costumes and they are classic but different..wonderful ideas!
ReplyDeleteCute!! I love candyland! it was one of my favorites when I was little!
ReplyDelete