Showing posts with label how-to. Show all posts

Sunday, October 16, 2011

Perfect October Saturday Night

I don't know about the rest of the country, but I think that in Northwest Ohio, October finally arrived. I ran into a friend from high school yesterday evening, and she was home visiting from North Carolina. She was telling me how it was 80 degrees there when she left! Up here, it was cold, dark, and windy. Perfect fall weather. :)

Anyways, last night, the wonderful Mr. Alex, a friend of mine by the name of Andrew, and I decided to make Apple Pie (the drink, not the food). I think this is becoming a yearly tradition for us, as this is the second year that Alex and I have made it. We also carved one of our pumpkins last night as well.


 I used one of those pumpkin carving kits from the store to make this one. I think it is officially the best pumpkin I have ever carved! (Even though it is hard to see anything but the carving in the picture. It just didn't look as good inside!) The hardest part about the process was that the tools were so tiny, that my hand was cramping up, especially when I was etching the template onto the pumpkin. We have one more pumpkin to carve, and I'm really hoping we can do the Grim Reaper design! Maybe I'll do a post about it in the future...

Anyways... Apple Pie.

If you don't know what Apple Pie is (and I'm surprised by the number of people who have had no clue what I was talking about!), it is a delicious, extremely alcoholic drink that's perfect for fall. There are a lot of variations on the recipe, so here is the one that we use:

Apple Pie
  • 2 Gallons Apple Cider
  • 1 Quart Apple Juice
  • 2 1/2 Cups Brown Sugar
  • 7 Sticks of Cinnamon
  • 1 Liter of Everclear
  1. Simmer the Apple Cider, Apple Juice, Brown Sugar, and Cinnamon Sticks for about an hour. When the cinnamon sticks uncurl, then the mixture is finished. Make sure to stir often to help the sugar to dissolve. 
  2. Let the pot cool. This part may take awhile. 
  3. Stir in the Everclear.
  4. Pour into canning jars. This mixture makes quite a bit, so make sure to have plenty of jars! Ours filled about 10 4-oz jars and 10 1-quart jars. Pint sized jars are perfect, as well. We left the cinnamon sticks in some of the larger jars, it is up to you.
  5. Let sit for at least 2 weeks, the longer the better. The longer the jars are able to sit, the more the flavors will meld together making the flavor of the Everclear disappear. 
**You can use other types of liquor for this, especially since Everclear is not available in most states (We have to drive to Indiana to buy ours). Regular vodka would work, and a spiced rum would also taste delicious. 


Happy October!!

Saturday, September 24, 2011

Barnfest

One of my favorite events held in my community this afternoon. Every year, we have an event call Barnfest/Fall Fest. Its basically a large craft show, to say the least. But the atmosphere of this event is great. I wish I would have taken some pictures. All of the volunteers dress very traditionally, in long dresses. Outside of the event, you can order homemade food. Every year, they sample a different soup, which they actually cook outside of in a very large kettle. This year was vegetable soup, and it was DELICIOUS!

Inside, there are a number of different vendors displaying their crafts. I picked up a few different purchases, which I'm super excited about! My first purchase was a 90 yard ball of alpaca/llama wool yarn, which is dyed brown and pink. I think I'm going to make a beautiful scarf out of it. My second purchase was a Corion cutting board. And then my third purchase was a ladder that, once we buy a house, I'll either use in the living to hang blankets on or in the bathroom for towels.

My #1 rule when walking around Barnfest is:

If I Can Make It Myself, Then I Won't I'm Not Allowed To Buy It

 I have some great inspiration now for some awesome projects! Oh, and there was a vendor selling Redneck Wineglasses. I make those! I'll have to do a tutorial on that particular project, because they are so super easy. Does anyone know the best glue to bond glass to glass? That's what I'm still trying to figure out.

There were two vendors selling one of my favorite creations! The one lady referred to them as Slub Wine Bottles, although when I tried to search for it to find y'all a picture, I didn't find what I was looking for. 


They are simply wine bottles that have been melted in a kiln. The reaction of each bottle is slightly different. They usually used as serving trays for cheese, but they have other uses as well. The best part is that my grandmother has a small kiln, so I'm thinking I can make these! I'm pretty excited. :)


My second favorite project was the lighted bottles that we found. 


They are simply empty bottles with a hole drilled through the back and Christmas lights stuffed inside the bottle. Some of the bottles we saw had a transparent paint, which was a super cool effect, and others were decorative liquor bottles. I'm really excited to make some of these as well, because I think they would look really neat, and give a nice effect in the evenings when you don't want the house all lit up.

One of the biggest projects being sold were fall wreaths. One of my favorites was decorated in black and white! I can't wait to make some wreaths. 

 Another project that you see all over the place were painted blocks of wood with cute quotes stenciled on. I bought one of these last year, and it looks really cute sitting on a table. A project like this would be really easy.

Maybe someday, I'll have enough projects to have my own stand at Barnfest!!

**please note that the pictures on this post were found via Google Images and were not taken by me at Barnfest.

Tuesday, December 21, 2010

Wrapping paper bows 101

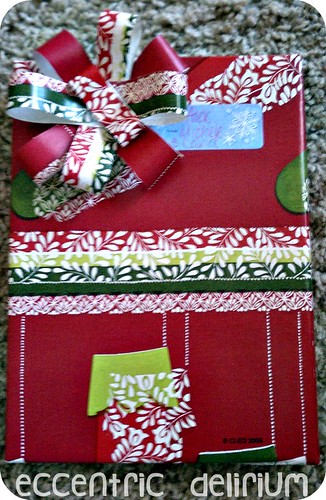
When I was wrapping Christmas presents the other day, I decided I wanted to figure out how to do wrapping paper bows to fancy things up a little bit. Here was the easiest one I could find, and I wanted to share it with you.

 
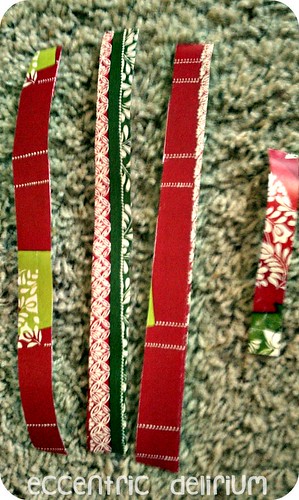
1. You will need 4 strips of wrapping paper (I forgot to photograph one. Do as I type, not as I photograph. Hehe.) that are 8" x .75" and then 1 strip of wrapping paper that is 4" x .75". The strips do not have to be cut perfectly straight, I would just make sure that there are no jagged edges.


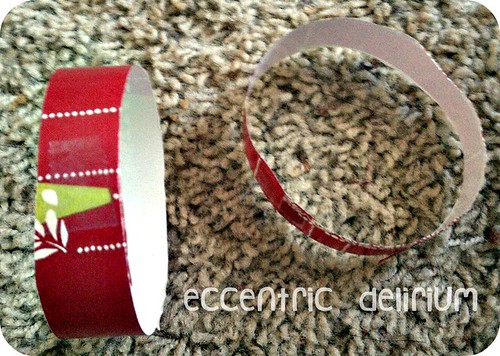
2. Now you will need to take all of your strips (even the short one) and create loops and secure with a piece of clear tape. You can either do these with the decoration facing out or in, it doesn't matter. Depends on the color bow you would like!


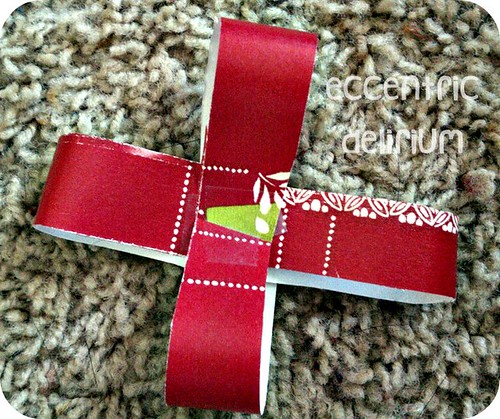
3. Now, take two of your longer loops and put one inside the other, so they're making a cross shape. I used scotch tape to connect them, but its much easier to use a stapler. But you'll need to flatten your loops and somehow adhere them to each other. Then, do this to your other two larger loops. Now, you'll have two cross shapes.


4. Now, you'll place your two cross shapes on top of each other to make a star shape, and then you put your small loop on the very top (whichever direction you think looks best). If you're using a stapler, slide the top of your stapler inside the small loop and staple through all the layers, that way you're hiding the staple and the small loop is still round. Since I used tape, I just flattened the small loop as well.


5. Use a piece of tape to attach your bow to your gift!


Monday, November 22, 2010

Homemade Lanyard

I have my first little tutorial, although it might not be very useful if you don't know how to crochet. Although, I will say that crocheting is really easy to learn. I taught myself by watching various "how-to" videos off of the internet, and now I'm addicted!

This product is really good for those who are just beginning. It's quick, and quite easy. Plus you have a lot of freedom if you want to practice using different yarns and stitches. However, the one I made is really quite basic. You will notice that there is a lot of flexibility in this pattern...

So, here's what you'll need for this lanyard:

 A latch/keychain. I got this one off of an old lanyard that I 
didn't want anymore.


A medium weight yarn. I used this Simply Soft by 
Caron. It's one of my favorites.

A 4.25mm Crochet Hook. This is
also the same thing as a size G hook.


Yarn Needle
  1.  Ch. 5
  2. Sc in 2nd chain from hook. Sc in each chain until end. (should be 4 sc's, making 5 stitches total).
  3. Do this for the length of of your lanyard. I'm not sure how many rows I did for sure, but I would say its about 100.
  4. Slide your lanyard onto into the D-ring of the latch. Slip stitch the ends of the lanyard together. I found it helpful to change the direction your hook is facing (so that it's towards you, instead of away from you). And then when you slip stitch, make sure to pull through all the stitches, which will be about 5.
  5. Cut and finish off your lanyard, and weave each end up the sides of your lanyard with a yarn needle.
  6. Cut off a generous amount of yarn (about 6 in.) and use the yarn needle to weave this yarn through the section of the lanyard above the D-ring, so that the D-ring doesn't slide around your lanyard. When I did this, I wrapped half the yarn section around one way and then cut off the end, and then wrapped the other half around the other way and cut off the extra. 
 Finished Product!

LinkWithin

Related Posts with Thumbnails